HOSTGATOR

Tuesday 19 July 2011

How To Remove Your Blog From NetworkedBlogs Facebook Application

NetworkedBlogs is a Facebook application to integrate your blog or website with Facebook. Now since most of the people are using facebook share to promote their blog on Facebook, NetworkedBlogs is not much useful.
I decided to remove HackTrix from NetworkedBlogs but was surprised to see that its difficult to delete the blog from this app. I had to search the web and read the documentation at NetworkedBlogs to find out how to delete the blog from this app.
To save you some time, here’s the procedure to remove your blog from NetworkedBlogs,

Case 1 – If You Have Less Then 50 Followers

1. Go to the application page, and click on your “Profile” link on top.
2. Scroll down a bit to find your blog under the “Blogs I Write” title, and click on the blog you want to remove from this app.
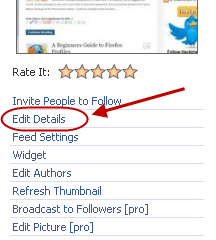
3. Now on the blog page, click on the Edit Details link,
remove blog from networkedblogs
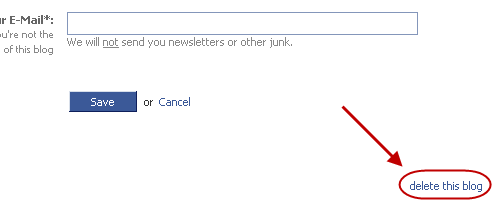
4. On the details page, look for the “delete blog” link in the bottom right corner. Just click on it and your blog will be deleted from NetworkedBlogs.
delete blog from networkedblogs

Case 2 – If You Have More Then 50 Followers

1. Go to the NetworkedBlogs page, and click on your “Profile” link.
2. Scroll down on the profile page to find your blog. It will be under “Blogs I Write” section. Now, click on the blog you want to remove from this app.
3. On the blog page, click on the “Edit Details” link,
remove blog from networkedblogs
4. Change the name of the blog to DELETE.
5. Get the email address of NetworkedBlogs support from the bottom of page and send them an email to delete the blog. It will be deleted in less then 24 hours.

Stay Away From Malicious Facebook Apps

Recently there’s been a flood of rogue Facebook apps that steal your personal information and use it for malicious purpose, like sending you spam mails, forcing you to fill surveys, selling this info to unsolicited advertisers and so on.
Most of these apps start by promising to show you a shocking video. You are tempted so you click to watch the video. You will be then redirected to an application’s page and you have to authorize this application to use your data if you want to see this video. Once you authorize the application, ‘they’ get access to all your personal data and are free to use it in any way they want. They will also post the same video link to your profile, so that all your friends will also get into the trap. See this video from Sophos that shows the life cycle of this Facebook worm live,

How To Stay Away From Malicious and Rogue Facebook Applications

1. Never click on any untrusted links on your Friends’ wall posts. Obviously messages like the following aren’t posted by your friends’ but rogue facebook apps,
I am shocked! The teacher nearly kild this boy: http://bit.ly/aWeBMl – Worldwide scandal!
Tempting words in the messeges like scandal, hottest etc. should be enough to convince you that its a spam message and you should not click it.
2. If you have already added any application that you don’t trust, then remove it immediately. Check how to delete any application from your Facebook account.
3. If you see these kind of spam links on any of your friends’ profile then alert her of the consequences and ask her to delete that post and the rogue application immediately. You can redirect her to this page so that she can learn all about the issue.
Its good to socialize and make new friends using the online social networking platforms like Facebook but make sure that your personal information is not compromised in the process.
Share this information with your friends and help make the web a safe place!

Is it Possible to Find Who Has Visited / Viewed Your Facebook Profile?

Every now and then I get a message, or see a wall post by a friend about an app that can track profile visitors on Facebook. Is it possible to track the visitors or views on your Facebook profile? Let’s find out.
In an FAQ, Facebook clearly states that its impossible to track profile views or visitors. Any application that does that is not accepted by Facebook as it against their TOS.
Can I know who’s viewing my profile or how often it’s being viewed?
No, Facebook does not provide the ability to track who is viewing your profile, or parts of your profile, such as your photos. Applications by outside developers cannot provide this functionality, either. Applications that claim to give you this ability will be removed from Facebook for violating policy. You can report applications that provide untrustworthy experiences by clicking the “Report Application” at the bottom of the application’s About page, or by clicking “Report” at the bottom of any canvas page within the application.
So basically when you get any message or see any wall posts about any Facebook application that can track profile views and visitors, chances are that these are automatically generated from already scammed Facebook profile.
If you click on any of these links and add these apps, a similar status will be automatically posted on your wall, thus making your friends also vulnerable. Check this post on malicious Facebook apps to learn more.
Conclusion: Its impossible to find out who has visited or viewed your Facebook profile, so stop looking for any app or method that does that.
Note: In case you have already clicked on any scam link or added a scam Facebook app to your account, remove that app from your Facebook account immediately to prevent further damage.

How To Delete or Remove Any Application From Your Facebook Account

There are thousands of different applications available on Facebook and I am sure you get multiple invites everyday from your friends to join new applications. There is nothing wrong with having too many applications added to your profile. Its just that,
1. They clutter your Facebook stream/updates. And sometimes it gets really annoying.
2. Applications have full access to your data, and some applications are developed solely to gather your personal information so that they can send you spam emails.
So if you want a clean Facebook updates page and want to keep your private information really private then you should delete any unwanted applications from your facebook account. Here’s the procedure-

How To Delete or Remove Any Application From Your Facebook Account

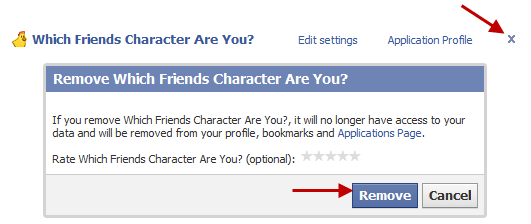
Once you are logged into Facebook, click on the Account link in the top right corner, and choose Application Settings from the drop down menu. This will take you to a page where all your applications will be listed. To remove any application, just click on the X button in front of it. Facebook will immediately confirm if you really want to remove this application. Just click on the Remove button and the application will be immediately deleted from your Facebook profile.
remove application facebook
Repeat this for all the application that you want to delete. Enjoy the clutter free and private Facebook environment!

How Can I Delete My Shaadi.com Account/Profile?

Have you got the job you were looking for and now don’t want to receive any emails from monster.com? Its really easy to unsubscribe from monster.com email newsletter.
Open any email message you got from Monster.com, and scroll down to find the unsubscription link,
unsubscribe from monster.com
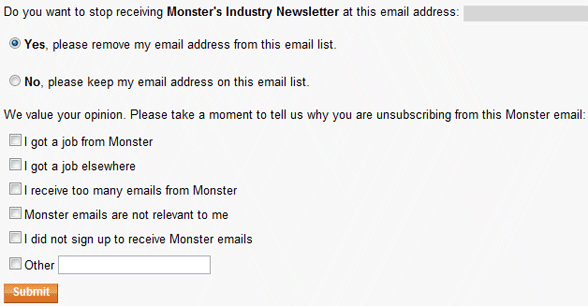
Click on this link, and select the option that says, “Yes, please remove my email address from this email list”. Then click on the Submit button.
stop monster.com emails
That’s it. Note that it may take upto 10 days for this change to take effect, so you may get an email or two from monster.com for the next 10 days after you have unsubscribed. But you will never get any email from monster.com after that.

How To Delete Monster.com Account

If you have got the job you were looking for, you may want to stop receiving emails from monster.com. But sometimes, even after you unsubscribe from monster.com emails, they still keep sending the emails.
Even if you report these email messages as spam, they somehow still land in your inbox, instead of the spam folder. Its probably because of the high trust of the monster.com.
So, the best way to get rid of monster.com emails is to delete the monster.com account permanently. To do so, login to your monster.com account, and go to, http://my.monster.com/Account/Settings.aspx, and click on Cancel Membership.
delete monster.com account
That’s it. You just deleted your monster.com account

Decide Who Appears in the Friends Box on Your Facebook Profile Page

There is a friends box on your Facebook profile page which displays a random list of Friends every time someone checks your profile. Do you know that you can choose who appears in this friends box? Its really easy…

Make Sticky Friends For The Friends Box

Click on the pencil icon on the top right corner of the friends box on your profile page to edit it. Then decide how many friends should appear in the box. After this, click in the box that says, Always show these friends, and just start typing the names of the friends you want to be ‘sticky’. Facebook will auto suggest the names as you type. The friends you choose here will always appear in your Friends box. In other words, they will be sticky.
facebook sticky friends hack
If the number of friends that you want to display is higher then your chosen sticky friends, then the rest of the friends will be selected randomly.

Find All Pending Friend Requests on Facebook

Do you know that you can get details about all the people who have not yet responded to your friend request. Here’s the procedure,

Get Pending Friend Requests on Facebook

pending friends requests facebook
  1. Go to Accounts > Edit Friends.
  2. On the Edit Friends page, click on the Friends List (its located in the left sidebar).
  3. Now in the Friends list, you can see all your pending friend requests as the people who have not yet responded to your request will be labeled with, Friend Request Pending.
Just visit any of these pending friend’s profile, and it will display the “Awaiting friend confirmation” button instead of “Add as Friend” link.

How To Find Your Orkut Friends on Facebook

If you are from India, then you probably started your online life from Orkut. But many of us have since migrated to Facebook, as its an international community, unlike Orkut which is popular only in India and Brazil.
If you left Orkut a long time ago, here’s a great new feature added to Facebook, using which you can reconnect to all your Orkut friends on Facebook. Its called, Orkut friend finder.
Using Orkut friend finder, you can find all your Orkut buddies on Facebook, and then add them as friends. You can also invite those who are not yet on Facebook using this feature.

Using Orkut friend finder on Facebook

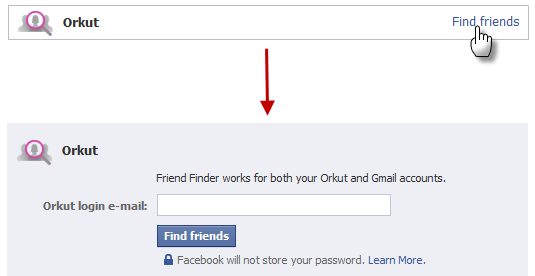
To get started, log in to Facebook, and click on Friends link in the left side. You will see all the pending friend requests on this page. Scroll down to find a section that says, Find your friends, wherever they are. Here, just look for the Orkut logo and then click on the link that says, Find Friends. Facebook will then ask you your Orkut’s login details to import all your Orkut Friends.
find orkut friends on facebook
Just enter the details and wait for few second until Facebook imports all the data. After the import process is complete, Facebook will show you all your Orkut Friends that are also on Facebook. You can add some, or all of them as Friend immediately. After this, Facebook will display the rest of your friends who are not yet on Facebook. You can then invite them to Facebook.

How To Invite Your Friends and Family Members To Google+

Since you are on this page, you are probably already in Google+. Now you may want to invite your friends and family members into Google+.
Sending invites for Google+ is really easy. Just click on the Invite People to Join Google+ link in the right panel of your Google+ homepage.
In case you don’t see that link on your Google+ homepage, you need to follow an indirect way to invite people to Google+.
First create a post. You can write anything in it, but it would be helpful for your friends and family members if your write that this post is about inviting them to Google+.
Now click on Add circles or people to share with… link below it and type the email addresses of all the people you want to invite. Then click on Share button.
All your invitees will then receive an email with your post. At the end of this email, there will be a button saying Learn more about Google+. Clicking on this button will take your invitees to the Google+ registration page.
send google+ invitations
Note that Google+ invitations are limited per hour. So sometimes clicking on that button may not work for your invitees. If this is the case, then tell them that they can try again after one hour using the same link.

How To Pause Blue Screen of Death (BSOD) in Windows 7

If you see a BSOD or a Blue screen of death on your computer, then the first step to troubleshoot the issue behind it is to write the error code that appears on the blue screen.
bsod error code
However, by default, most Windows systems restart automatically in case of serious errors that normally cause a BSOD. So you see the BSOD for a couple of seconds and the computer restarts instantly making it impossible to write the error code.
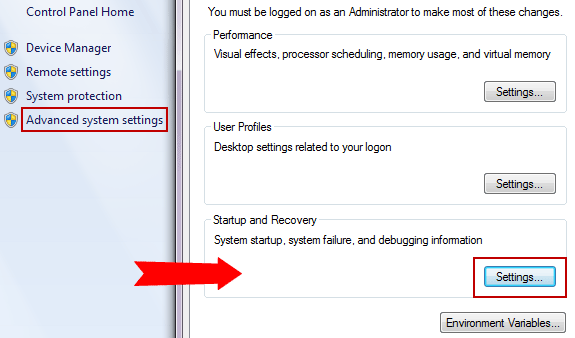
To pause the BSOD, you have to disable the automatic restart of Windows in case an error occurs. To do that, right click on My Computer and select Properties. Then select Advanced System Settings from the right panel.
windows 7 advanced system settings
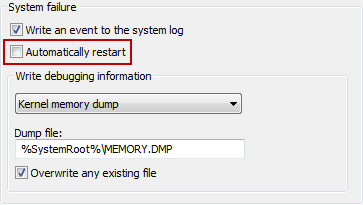
On Advanced System Settings window, un-check the Automatically Restart option.
pause bsod blue screen of death
That’s it. Now Windows will not restart automatically in case of any serious issue and will pause at the Blue Screen of Death (BSOD) screen.

FREE US NUMBER

Do you need a US phone number even if you are located outside US? Here’s a simple way to get a US phone number, from any country in the world, for free.
get us phone number
First Get a SIP number:
To get a free US local phone number, you must get a SIP (Session Initiation Protocol) number. You don’t need to know what is a SIP number to get a US phone number, but if you are interested, check this page.
There are many services that provide free SIP number. Two of them are listed below along with the detailed explanation on registration process. Use any one of the to get your SIP number.
Go to CallCentric and sign up for a free account. After sigining up click on the confirmation link they send you on your email address to confirm your email address.
After email address confirmation, fill your country code and city. If you don’t know the country code for your country, get it from the country calling code finder. Now agree to their terms and click on the Sign up button.
Click on the link that says Go to My CallCentric and copy your CallCentric number. It will be in the format 1777**
Go to Tpad and sign up for a free account. Unlike CallCentric, they ask you for all the information like you name, address,etc. while registration.
While registration, you must provide your phone number in international format. That is, you must add your country calling code before your phone number. To get the calling code for your country, check the country calling codes page.
After registration is complete, you will get an email from Tpad which will have your SIP number. Copy this SIP number as it will be used in the next step.
Get US Local Phone Number using your SIP number:
Now that you have your SIP number (using either of the method explained above), open a new tab in your browser and go to phone.ipkall.com.
Set the account type as SIP. In SIP username field, paste your SIP number. Keep the default value for the area code and the # of ringing seconds. For the host name, email and password:
  • If you got your SIP number from Callcentric, use in.callcentric.com for host name. Use the same email address and password that you used while registering for Callcentric.
  • If you got your SIP number from Tpad, use sipx.tpad.com for host name. Use the same email address and password that you used while registering for Tpad.
Click on the submit button to complete the registration at ipkall. You will get an email from ipkall within few minutes containing your own US phone number!
Activate and use your local US phone number to get incoming calls:
Now that you have your own local US phone number, you can easily get incoming calls from your clients and relatives that are based in US. To start receiving incoming call, you must configure a SIP client on your mobile phone or computer.
If you have an Android phone or iPhone, look for SIP Phone apps on Android marketplace or iTunes respectively. For Symbian phones (Nokia phones) you can configure SIP on it without any third party apps.